Photo Ready Prom Henna: 10 Designs and When to Book
- angana0403
- 5 days ago
- 10 min read
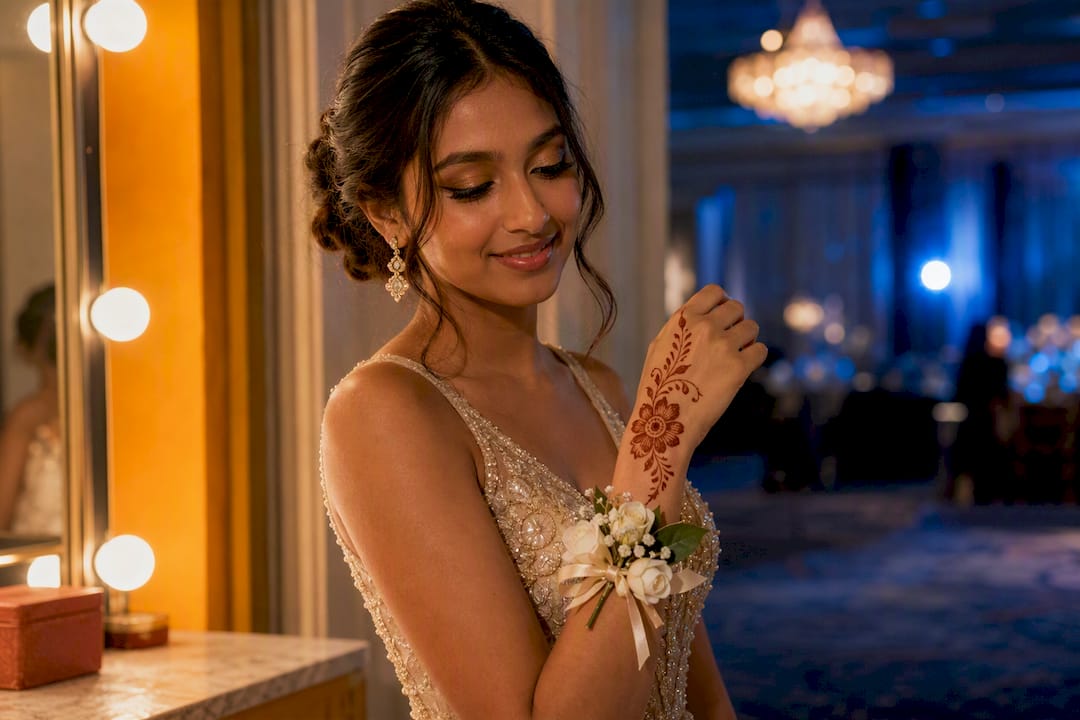
The best prom henna picks by far are a wrist corsage vine, minimalist finger accents, a back-of-shoulder statement piece, or a leg vine for anyone showing skin below the knee. The one non-negotiable rule beneath all of it: book your henna 2 to 3 days before prom and insist on pure henna paste, never “black henna.” Everything else, from motif choice to aftercare, builds on those two decisions.
TL;DR:
Book henna two to three days before prom to ensure deep, long-lasting stains that look vibrant in photographs.
Opt for bold, visual weight designs like wrist vines, leg vines, or jewelry-emulating motifs that stand out under flash and stage lighting.
Simplify your design choices if you have limited time or less steady hands, focusing on single motifs or finger dots for quick, impactful results.
Choose placement based on your dress style, with back-of-shoulder or upper-arm designs for strapless dresses and hand or wrist designs for photos and group shots.
During application, prioritize high-quality, pure henna paste and proper aftercare to achieve a deep, reddish-brown stain that lasts through prom night.
Table of Contents
Prom Henna Ideas: 10 Designs to Screenshot or Show Your Artist
These ten cover the range from five-minute DIY to full appointment territory, and each one has been picked because it photographs well under gym lighting, string lights, or a photo booth flash.
Wrist corsage vine. A slim floral vine that circles the wrist where a corsage would sit. Pairs with almost any sleeve length. DIY-friendly with a stencil, five to ten minutes.
Minimalist finger bands. Small rings or dots at the knuckle. Works with strapless and short-sleeve dresses. Easiest DIY option on this list.
Back-of-shoulder starburst. A radiating floral or geometric burst that peeks out of an open-back dress. Needs a second person or a pro artist since you can’t see your own back.
Leg vine climbing the calf or ankle. Great with slit skirts or shorter hemlines. DIY possible if you’re flexible; pros do it faster and cleaner.
Jewelry-emulating hand piece. Henna drawn to mimic a ring, bracelet, and connecting chain across the back of the hand. Reads like real jewelry in photos, which means less to accessorize. Best left to a pro for the fine linework.
North African-style asymmetrical band. Bold, high-contrast bands with mixed fill patterns running up the forearm. This North African henna style photographs particularly well in evening light because of its strong lines and asymmetry. Moderate difficulty, better with practice or a pro.
Arabic/openwork floral trail. Large flowers with negative space between them, trailing up the hand or foot. Reads dramatic without covering every inch of skin. Add tiny gems along the trail for extra sparkle.
Mandala palm centerpiece. A circular design filling the palm, meant to show when hands are clasped for photos. Intermediate DIY difficulty.
Anklet-style foot design. A delicate band circling the ankle with a small drop motif on top of the foot. Ideal for open-toe heels. Quick for a pro, fiddly for a beginner.
Fingertip dots with a single accent flower. The lowest-commitment option. One flower at the base of a finger, dots trailing toward the wrist. Takes minutes and barely shows if you need it gone before graduation photos.
For camera purposes, remember that fine, thin lines can vanish in flash photography while bolder bands and filled motifs hold up. If your prom photos matter as much as the dance floor, lean toward designs with some visual weight rather than hairline detail.
Placement and Dress Pairing for Photo-Ready Henna
Placement decisions come down to sleeves, neckline, and what you’re already wearing on that wrist or hand.
Strapless or off-shoulder dress: back-of-shoulder or upper-arm designs get full visibility.
Long sleeves or a jacket over the dress: hands and fingers stay visible even when arms are covered.
Corsage on the wrist: choose a design that frames rather than competes with it, like a thin vine below the corsage line.
Statement jewelry planned: skip the jewelry-emulating hand design and pick a wrist or ankle piece instead, since two “jewelry” looks in one photo reads as clutter.
Slit skirt or short hem: leg and ankle vines get their moment; hidden under a long skirt, they’re mostly for you.
Hands and wrists show in nearly every prom photo, from hand-holding shots to the group photo where everyone raises a glass of punch. Backs and legs look striking but only when the dress actually reveals them, so check your gown before committing to a placement you’ll never see in pictures.
Design Styles That Fit Your Prom Look
Every henna design draws from a handful of visual languages, and picking the right one comes down to how much detail you want and how bold you want it to read from across the room.
Floral is the safest, most universally flattering choice, soft petals and leaves that suit almost any dress color. Minimalist designs use negative space and single-line motifs, ideal if you want henna without it stealing focus from your dress. Arabic-style openwork leans into big flowers with breathing room between them, dramatic but not dense. North African band styles favor asymmetry and mixed fill patterns packed into bold bands, a look built for stage lighting and camera flash. Jewelry-emulating designs trace the outline of rings, cuffs, or chains directly onto skin.
Every one of these styles is built from a small set of repeating elements: the hump, the fishbone, the sprout, and the paisley, which The Henna Page’s free pattern guides teach as the foundation for basically everything else. Vines connect motifs together, paisleys anchor corners, and small sprouts fill gaps between larger flowers.
Hump and fishbone: quick fillers for small spaces between larger motifs
Sprout: a leafy accent that softens sharp lines
Paisley: a strong focal point, often placed at the center of a palm or shoulder design
Vine: the connective thread that turns separate motifs into one flowing piece
Pro Tip: Practice your chosen motifs on lined paper before your appointment or DIY session. Ten minutes of hump-and-fishbone repetition the night before makes a real difference in how clean your lines look on skin.
Our beginner henna designs guide and floral design templates are worth a look if you want to practice before committing to a bigger piece.
Should You DIY or Book a Henna Artist for Prom?
The decision usually comes down to design complexity and how steady your hand is with a cone.
DIY works for: finger dots, a simple wrist vine, or anything using a stencil from a DIY henna stencil kit.
Hire a pro for: full-hand pieces, back designs you can’t see yourself, or anything with fine jewelry-style linework.
Bring: a reference photo, your dress color, and enough time in the schedule to let the paste sit undisturbed.
Budget tip: a small group booking one artist for a pre-prom henna party usually costs less per person than everyone booking separate solo appointments.
Timing and Aftercare: Getting a Stain That Lasts Through Prom Night
Apply henna 2 to 3 days before prom, not the morning of. Henna stains oxidize over time, starting orange and deepening to reddish brown over 24 to 48 hours, which means henna applied the night before prom will look pale by the time you’re posing for photos. This oxidation window is exactly why pre-prom timing guidance consistently points to a two to three day buffer.
Leave the paste on for several hours, ideally 4 to 8, before scraping it off.
Seal the paste with a lemon-sugar mixture before it fully dries to help lock in moisture and deepen color, a technique detailed in Henna For Fun’s aftercare guide.
Keep the area warm after removing the paste since body heat speeds up oxidation.
Avoid water for at least the first few hours after scraping off the paste.
Once set, clean the area gently rather than scrubbing it.
If your stain looks lighter than expected the day before prom, reapply a thin layer of fresh paste over the design and leave it on a few extra hours. It won’t fully rebuild a faded stain overnight, but it can deepen the color enough to photograph well.
Henna Safety: Avoiding Black Henna and Bad Reactions
Pure henna paste made from the henna plant produces a safe, temporary stain. “Black henna,” on the other hand, frequently contains para-phenylenediamine, or PPD, a chemical dye that can trigger serious allergic reactions, blistering, and permanent scarring.
Ask your artist directly what’s in the paste, and walk away from anyone advertising an instant black stain.
Some tourist-market henna mixes are adulterated with additives beyond just PPD, so stick with known, reputable sources.
Patch-test a small area 48 hours ahead if you have sensitive skin or a history of reactions.
Skip henna entirely over broken skin, recent tattoos, or fresh piercings in the area.
How Henna For Fun Handles Prom Bookings and Lessons
We run prom groups through the same process as any event: a quick design consult, clean tools, and fast motif sets that keep a line moving without rushing anyone’s design. Whether you want a private lesson, a group Whenna Event, or a DIY cone to practice at home, there’s a format that fits a prom timeline.
Popular Henna Color Variations for Prom
Natural henna paste stains a reddish brown that deepens over 24 to 48 hours, and that’s the baseline color most artists work with for prom bookings. But plant-based additives change the tone without touching the safety profile the way synthetic dyes do.
Adding indigo over a healed henna stain can push the color toward a deeper brown or near-black, a two-step process rather than a single application. Cassia, sometimes called neutral henna, produces a much lighter, golden stain and works well for anyone who wants a subtle accent rather than a bold statement piece. Essential oils like cajeput, tea tree, or lavender are mixed into the paste not for color but to help the stain develop darker and more evenly, since they help the dye release from the leaf.
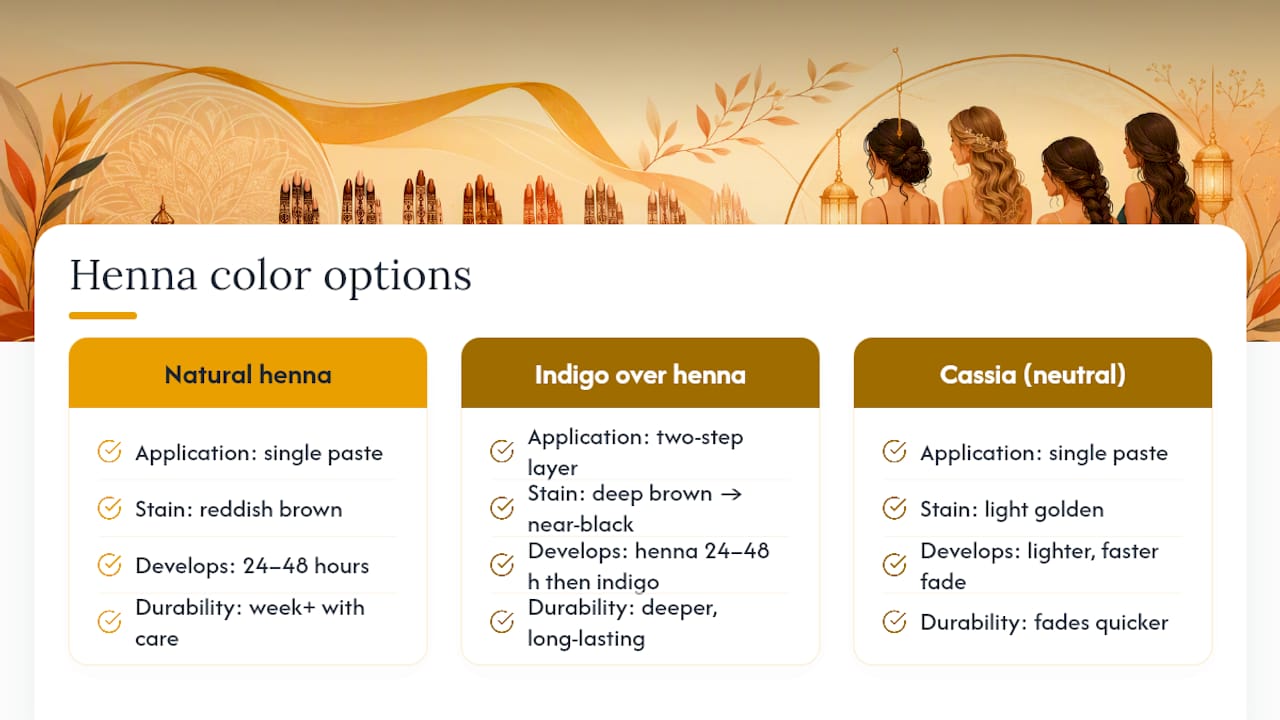
For prom specifically, the deep reddish brown from a well-made pure henna paste is usually the most reliable choice. It shows up clearly against most skin tones and holds its color for a week or more with good aftercare. Lighter cassia stains fade faster and can look washed out in flash photography, so save those for a more subtle everyday look rather than the main event. If you want variation without switching products entirely, ask your artist about layering a slightly heavier paste application in your focal motifs and a lighter touch on filler details. That contrast alone creates depth in photos without any additive at all.
Celebrity and Influencer Prom Henna for Inspiration
Red carpet and award show henna moments have pushed mainstream interest in mehndi-style body art well beyond South Asian and Middle Eastern celebrations, and that visibility has trickled straight into prom season. Bridal and event henna looks shared by beauty influencers, especially minimalist wrist and finger designs, are some of the most screenshot-and-share styles heading into prom.
The trend worth borrowing isn’t a specific celebrity’s exact design. It’s the restraint: many of the most-shared looks use one strong focal motif, like a single detailed flower on the back of the hand, rather than covering the entire hand and forearm in dense patterning. That approach translates well to prom because it photographs cleanly, doesn’t compete with a dress or jewelry, and takes a fraction of the time a full-hand piece requires.
If you’re pulling inspiration from social media, pay attention to hand position in the photos you’re saving. A design that looks stunning with fingers spread wide might read differently when your hand is relaxed at your side for most of the night. Save a few references, bring them to your artist or your own DIY session, and be ready to adapt the scale to fit your actual hand size and the sleeve length of your dress.
Coordinating Henna With Your Corsage and Accessories
A corsage takes up real estate on your wrist, which means your henna design needs to work around it rather than against it. Ask your artist to leave a clean band of space where the corsage will sit, with the vine or floral pattern framing that space above and below rather than running straight through it.
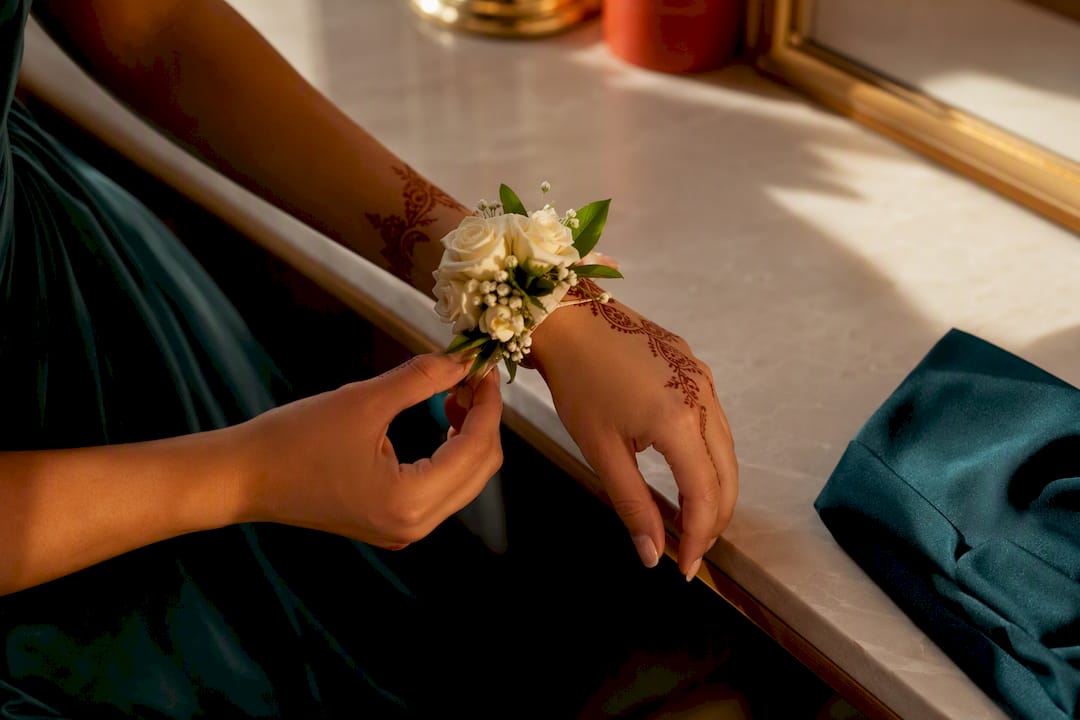
If you’re skipping a corsage in favor of a bracelet or watch, the same logic applies. Jewelry-emulating henna designs look best on a hand with no competing metal jewelry, so choose one or the other rather than layering both. For rings, a henna accent at the base of the finger works better than a full jewelry-style band, since it won’t visually clash with an actual ring.
Shoes and nails are easy to coordinate around, too. A gold or metallic accessory pairs naturally with a warmer, reddish brown stain, while cooler-toned accessories look sharp against a design with more negative space and thinner lines. For nail inspiration that complements your henna rather than competing with it, these prom nail ideas are worth a look before your appointment. And if you’re still finalizing your dress, these prom dress styles can help you settle on a silhouette before you lock in placement for your henna.
What Actually Matters More Than the Design You Pick
Most prom henna advice online obsesses over which design looks trendiest this year, and that’s the wrong place to spend your worry. The design is the easy part. What actually determines whether your henna looks good on prom night comes down to two boring, unglamorous factors: timing and paste quality. A stunning jewelry-emulating design applied the morning of prom will look pale and disappointing by dinner. A simple wrist vine applied three days out, sealed properly, and left alone will look rich and deep all night.
The conventional wisdom oversells complexity and undersells patience. Teens searching for prom henna ideas tend to gravitate toward the most elaborate design they can find, assuming intricate automatically means impressive in photos. In practice, a bold, well-timed, simple design usually reads better in a photo than a rushed complicated one with patchy color. Prioritize getting the timing and the paste right first. Pick your design second. If you do both, almost any style on this list will look good in your prom photos.
— Angana
Book Your Prom Henna With Hennaforfun
Hennaforfun turns prom henna planning into a fixed, no-guesswork appointment instead of a gamble on a random stencil kit or an unverified artist. If you want to learn to do it yourself, a private henna lesson walks you through real technique before prom weekend arrives. If you’d rather book a pro for you and your friends, a Whenna Event turns pre-prom prep into its own mini celebration, with an artist working through your whole group in one sitting.
Prefer to do it at home? Pick up a handmade henna cone or a set of DIY stencils and practice the motifs from this guide before the big night. Check the calendar for open event dates now, since prom season books up fast, and plan on reaching out at least two to three weeks ahead for group bookings.
Sources
The Henna Page’s pattern ebooks teach the core motifs from scratch. Our minimalist design collection and practice sheets help you rehearse before your appointment.
Recommended
Comments